31 December 2009

it's a new dawn, it's a new day...


After having a sick household for the middle half of December, and then scrambling to finish preparations for Christmas, this in between week has been welcome respite. We had a very lovely time with friends and family, and the boys were spoiled by everyone. The best part of it all for them was seeing and playing with their cousins, Aunts & Ankles, and friends. They jumped up and down with excitement for each gathering. Thank you all!

2009 wasn't so hot in many ways, but we are all well and happily watching our little boys grow. We're better off in some some ways than this day last year, and not so much in others. We said goodbye to our beautiful, sweet, greyhound Joey. We said hello to some new friends, and many new experiences with a pair of 2 year olds. This space came alive. I am grateful, and only want to make it better going forward. No wasting time with what didn't get finished, or what the clock left behind - I'm moving on.

I thank each and every one of you who came to visit, I hope you enjoyed your stay. Lots of ideas on tap, so much new to lay out this year - so stay tuned!

photo courtesy banyantreebiketours.com

28 November 2009

for sale by maker


These are the first 3 of a series of limited edition bags that I've been working on for sale, and I'm so excited about how they're turning out! I really enjoy working on them. Each bag has a common element which sparked this whole project - the velvet leaf appliquéd on front.


About 7 years ago my sister gave me a curtain panel with these leaves attached at the top. I didn't really have a use for it as is (was), but liked the parts - removed the leaves, and the panel became a tablecloth we still use today. The leaves surfaced recently in a materials search, and the idea came together for the bag series. It is very fun, and a challenge, to design & gather the parts for these. As with all my projects, they are made with leftover and repurposed materials. Each will be completely one-of-a-kind, can't be reproduced. There are only a certain number of leaves, each a different shape/color combo, and all the fabrics are in limited supply. I really like that aspect. If you've ever tried to mass produce a handmade item, you know what I mean. They'll be siblings, each with it's own personality - but not twins.

Perfect for a commuter, going shopping, yarn & knitting, just shlepping all the stuff we seem to carry here & there. Carry your cookies to the cookie swap & give it as a hostess gift. Great for the office yankee swap, too. Replace those plastic bags your Mom carries all the time! There are still more in the works, and a little time to work on requests, so contact me if you need something special, have questions, etc. (at upper left or see below)

Each is fully lined with an interior cell/keys, etc. pocket. Front side has velvet leaf and fabric detail, back is solid unless noted. Fabrics include canvas, heavy upholstery fabric, cotton twill, cotton & cotton/linen linings. Sturdy and reinforced; machine washable (inside out) in cold, reshape & hang dry.

#1 (top picture) Green Leaf East is 16"wide x 15"tall x 4"deep - in greens, tans and naturals. Natural color twill handles. Natural color lining. Detail below. $35.


#2 (second picture) Deep Green North is 18"w x 14"t x 5"d - in caramel, greens, brown and brick. The back of this bag is half solid, half patterned fabric from the front & handles. Natural color lining. Detail below. $35.


update  #2 SOLD Thank You!

#3 (third picture) Cranberry Leaf West is 19"w x 15"t x 5"d - in cranberry, tan and multi. Tan canvas handles. Striped lining. Detail below. $35.


Thanks for checking them out, & pass it on! Happy shopping...

05 November 2009

gathering treasures


I've mentioned before that Mason always comes home from our walks with something in his hand. Be it a leaf (the last of the 35 he's picked up & discarded) or twig, pine cone or pebble, always something. Not to be outdone, of course, Nate has followed suit. It's funny to note the differences - Mason always picks the 'Charlie Brown' leaves, etc. and Nate goes for the big size or impact.


All these treasures need to be carried, and my hands are full with the hands of two boys, so... the Gathering Treasures Bag was born. The idea was kind of an old newspaper-boy's bag/messenger. It goes across the body with an adjustable strap for hands free use, and closes with vintage button & elastic loop. Simple construction, there are no pockets to get in the way of small hands filling & emptying. It's lined with fused grocery bags, which give it perfect structure & support. The fused material was a dream to sew & use. I've posted about this before here and here.


All the materials were of course gathered from around the house. The fabric is left over from my friend's curtains that I just hemmed, the straps are twill tape that came tied around a rug I ordered years ago & the colored stripe is seam binding from my Nana. (the green will be for Mason, and a blue striped one is in the works for Nate) The hardware I've kept from something taken apart who-knows-when, and the buttons are from my dad's circa 1950s hunting jacket. I cut that up when I was a kid, and the buttons remained. The elastic loop came from something I unwrapped a week or so ago - and can't remember what the heck it was. I know where things came from that have been around 20 years, but last week? No clue. I blame it on my kids.

I've been using all my spare time for work projects lately, but so many ideas have been flooding in, too.  I'm planning on a limited edition project for sale, post to come soon...

22 October 2009

are these too girly?


That's the first thing that came out of my husband's mouth. "Aren't those a bit... girly? I mean, they're knit." O. K. 

I was excited to even have gotten a slipper shape, having just grabbed some of my Nana's yarn & a crochet hook and just went with it. No pattern, no nothing. And each slipper came out the same size as it's mate - another feat. Any knitter or crocheter knows what I mean. The blue pair - Nate's, came first, but I figured the shape out a bit better when doing Mason's. I was happy with them given that these just came out of my hands and brain with no other starting point than the fact that my boys need slippers. I think Nana would like them.


But, my bubble has been effectively burst. Can anyone tell me that a pair of nearly 3 year old boys can wear them (even in front of company) without being embarrassed? Oh - they do get embarrassed, they yell at their dad to stop dancing all the time. It's true.

So, let me know - comment your vote. I can take it, and I'm sure my husband can, too.

07 October 2009

apples, fire trucks, pumpkin pie


It's not fall in New England without a day spent apple picking, pumpkin gathering, and checking out a farm stand. Nate actually ate his apple, Mason just held one tight. He did pick out his own pumpkin, very carefully.


We spent a beautiful day doing all that, and got a special exclusive Lieutenant-guided tour of a Firehouse & Fire Trucks this Sunday. The boys are nutty over fire trucks, and our friends Jackie & Barry were kind enough to invite us for a tour of a firehouse. Barry's a volunteer fireman & Lieutenant in Brookline, NH. Although the trucks were awfully large compared to a two & a half year old, they did rather well. And haven't stopped mentioning them since.


I filled up my basket with our fresh-from-the-tree apples, and filled our home with the smell of apple crisp last night. Yum. I love fall.


the first 3 photos are thanks to Cayce...  Thank You!

22 September 2009

bench found incognito


This little piece doesn't look like much. A client of mine used it for years as a side table - with a tray on top. She didn't know what it was, or where it came from - but before tossing it out, asked me if I wanted it. Thank You!

I knew right away that it was a bench, from either an expensive cabinet sewing machine (it's all mahogany) or possibly an upright piano. I think 50s. Guesses without lots of research, but I'm relatively sure. So it got a good cleaning - the finish was still very nice, thankfully. A bit of oil, and it looks great.


The seat needed to be re-created, so I went to my plywood scraps & cut one to fit. I had fabric of course, left over from... something. Any black fabric will do for the dust/underside cover, and to the stash for one inch foam & 2 layers of batting... ah. Comfy, easy to tuck away & just right when you need it. Works for me.

Last week was a little unexpected hiatus, with my hands full of boys, design work, usual chores and such. Hopefully I'll get a good rhythm going soon. I enjoy this space and all the projects it documents. Hopefully you do, too.

11 September 2009

the finished basket


But it's much more than that. It's a completed project (those of you with a half dozen, half complete projects understand this) and a discovery & successful implementation of a new to me technique (fusing plastic bags). It's a physical manifestation of one reason why I wanted to create this online dialog - to bring creativity back to my life on a continual basis and have accountability for it. And it's also a spark... now that I've found a new material to work with, there are endless possibilities for it's use. My niece Ali would enjoy creating with this. It would be the perfect lining for the puppy-treats bag she wants to make.


The fabric liner was very quick & easy. If you haven't done it before & need info, comment here & I'll do a tutorial. My list is growing :). The fusing was so simple - I think I'm hooked. It took under 10 minutes from getting out the iron to the completed piece. I can deal with that! For this I used 4 bags, yielding an 8-layer piece. Cut it to size/shape with scissors, and there you have it. My last post has the link to the how-to, if you didn't already go. I highly recommend giving it a try, & seeing what you can do. This project start to finish, was completed while my boys were napping - under an hour. 
Now to go apple picking...

09 September 2009

my favorite season

is finally here! It always feels like new beginnings for me when fall comes, just like spring. We've had a few days of cool autumn temps, and it gets me looking forward to all the season has to offer. Like the smell of hearth fires on a crisp evening walk, the colors & light, state fairs & foliage trips, fresh apple cider & warm apple everything...

On that note, my little project for the day is to overhaul a basket given to us by my sister's dear friend Lucy when she met my newborn twins. It was filled with lots of fun, artful, useful, & quirky goodies. Just like Lucy herself.


I'm going to make a new fabric liner for it & plan to put it out on the table with apples in it. The scrap of fabric is from a cushion project, and will work well. To guard against any "fruit incident" occurring  (that sometimes happens, you know - leakage) I'm also going to to do a fused plastic bag pad/underliner to take care of this problem. I'd found the info awhile ago, through etsy & have been wanting to try it out. This seems like the perfect project to do so. I'll let you know how it goes.

03 September 2009

preppy, meet sporty


Time again to think about long sleeves. This shirt was born from a too large polo with a stain on the front, and an interesting t-shirt that were both handed down from cousins Tommy & Kevin. I like the personality mix.


The neck band from the t was in perfect shape, so I used it as is. The basketball graphics from the t front & back make great sleeves, but I did have to add a bit of the polo on one sleeve to get the proper length - I think it balances well with the graphics on the other side. And the hem I kept from the polo, so this shirt was a breeze. The pattern I made from a couple of different patterns, awhile ago, so I'm sorry no name & number for that... but it's a simple raglan sleeve shirt, there are probably dozens to choose from. I need to make sure that patterns are long & lean to fit my guys, so I end up altering or making my own (mostly).

Nate is the 'blue' guy - now I have to get a green one together for Mason.

26 August 2009

another app for that...


It dawned on me that there's a whole other avenue of use for my supplies board - it can be a place for your children's found treasures. An interactive and evolving display of found objects and favorite things personal to them. My Mason is always finding a leaf or stone to bring home almost wherever we go, and this would be a great place for his objects to live. He could add & change it by himself, and have a show & tell of his travels.

My first one is too adult looking for a child, I think - and also horizontal may be better for easy child access. Clear lids are best for viewing, but not crazy about the black for kids, either. I'll have to scour the cupboards. My husband wants one for herbs & spices (he's quite the cook) but I hesitate to use plastic. I'd love aluminum for food use, or glass, but with glass I'd have to check into adhesives. This simple idea is really branching out!

For now, I guess I need to get busy on some kid-friendly treasure boards.

21 August 2009

there's an app for that...


Just a useful little something from what I already had, in my attempts to organize my evolving studio space. This handy little item can hold a myriad of supplies, buttons & beads, nails & screws, embroidery floss, paper clips & rubber bands et al...  the list goes on. It can also be made from lots of different wood types, old painted moldings, just about any kind of scrap you may have. Mine is 28.5" finished length because of the piece I had. It can hang vertically or horizontally to suit your space - above your desk,  under a shelf, wherever you need it handy. Take it down, open it up & use what you need.

I made the top in the shape of a cutting board that hung on the wall in my sister's old apartment in Brookline. I always liked it. But the board doesn't have to have a shaped top or end, you can drill small holes for a piece of ribbon or leather shoelace to hang it just as well. The containers I used are sturdy plastic food containers about 3.5" at the widest point. Again, many different items can be used. I measured out points on the board & drilled through the container from the front. I have some extras, so if anything breaks I can replace it easily.

It's all about taking a look at the things that pass through our lives & seeing if we can do better than just throwing them away. I'm calling it a Supplies Board. What do you need one for?

18 August 2009

back to life, back to reality


My favorite shot from this past week... the boys napping sweetly on the beach at the Cape. Lots of fun, not too much sun, (no burns!) lots of little treats, and lots of cousin time. Nate loved the rides in Ankle Bill's truck (he can't quite say uncle), and Mason loved chasing - actually, being herded by - JenJen the shelty dog. A big week of beach, seafood, and hanging out. Big Thanks to Auntie Janie & Ankle Bill for having us!

But now, after some family at our house, and then being away... it's back to life, back to reality. I'll have to look up what song that is. Anyone remember?


This project has been developing in my mind ever since I first saw the little salad dressing take out containers. I like ovals. I've saved them all with the intent to do something. The wood is a scrap from my workshop - a piece of cherry that will finish up very nicely with a coat of clear satin. It's a sample piece from cabinets for a kitchen I did a few years ago. Random small screws round out the materials. If you can't guess what it is, you'll see the result in my next post. Check back for the reveal!

05 August 2009

a family in August


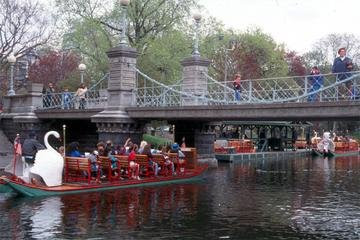
This week we have been hosting my mil, Grandma Audrey & boyfriend Joe, seeing the sights in & around our fair city. In all my years of living here, Monday was the first time I'd ever been on the swan boats in the Boston Public Garden. It was a very sweet afternoon with cooperative weather, smaller than usual crowds, a perfect parking spot (yes, a Birthday parking spot, Kim) and happy boys enjoying the boats and walking through the park. It's nice to be a tourist once in awhile, right in your own backyard.

I've got a non-sewing old beginning in the works, to be posted as soon as I can. Next week - the beach, with the other side of the family. Good, busy, fun.

photo from pps.org

31 July 2009

rainy morning lounging


Perfect comfort for a rainy day book reading session. Mason's ice cream farm pants were just completed, and now we have to go get some.


Oh, our cherry tomatoes on the kitchen window sill were too cute to resist, waiting to be grilled this weekend...

Enjoy!

28 July 2009

I love t-shirt pants!


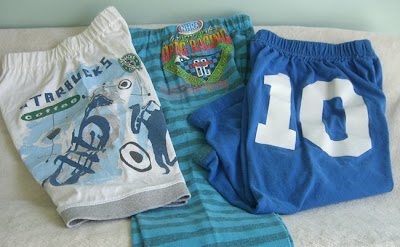
These have been brewing for awhile, so I finally grabbed an hour here & there to get them done. Tons of creative possibilities.  They can be long, short, or in-between. They can be simple or layered with details. These are all sized 2-3T, so one shirt is all that's needed, even a large child's sized t. A great way to use some neat graphics from a shirt you no longer - or just don't, wear. Even hand-me-downs, thanks to cousins Tommy & Kevin!

All of these shirts were given to me & had been hanging around in one drawer/bin or other, just waiting. When the weather started getting warmer & my boys needed some lighter weight pajamas, I started on these. Everything I used was already in my studio, including the elastic. Gotta love that! The pattern is the same Kwik Sew I very loosely used before - on these the adjustments were on both length & width, blending sizes, all kinds of crazy stuff. It would be easier to copy a pair that fits or just needs an adjustment you can handle. That being said - these are very simple & quick. Once you do one, you'll want to make more.


You really can go nuts with details on these little pants. I created & added the pockets, and love how they came out -  especially the leftover neck band at the top edge, (on the striped pair) and the pleat that makes the other look like a cargo pocket. The leg banding I also added - on the white pair it's leftover from the polo shirts turned into hoodies project from my first post. It's the ribbing from the sleeves. Love that detail - it makes a nice clean finish & the contrast topstitching ties it together. The blue pair uses the neck band from the striped shirt, but there wasn't enough for both legs. It adds to the overall personality, I think.

Anyone interested in more sewing details or a tutorial, just comment on this post & I'll give you the info you need. I'll try to get some action shots posted, too!

24 July 2009

hoodies in action

So, we were playing in the yard yesterday before the rain came and I thought I might be able to get a few good pics of the boys with their hoodies on. How many of you are laughing at me right now? Anyone who has littles & specifically wants to get decent photos - yeah. Well, this is what happened before the batteries died on me. At least there's one of Mason's head! Nate was not feeling so cooperative.

Have a great weekend!

22 July 2009

coming home


Well... I started sewing again, and creating things again (outside of work projects) since my boys were born.
I've missed it more than I had even realized. 
It felt like coming home.

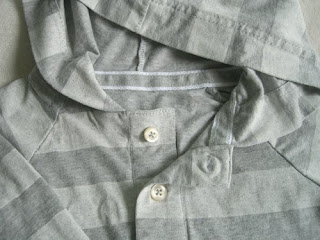
So... here's my first old beginning that I have to share. These hoodies for my boys were made from polo shirts given to me by my mother-in-law. They were too big for my husband, but a bulb went on when I saw them. The XL shirts had enough fabric to do something long-sleeved (in a 2-3T size) - and with a bit of finagling I squeezed  in a hood. I'm a sucker for hoodies on my little guys!

The before of one of the shirts (they're both the same except for color) ...

It all started with careful deconstruction, keeping intact the front button placket to use and carefully removing all other details that would be reused, but altered. Some elements were not used again here, but saved for future use. It's amazing how useful all the parts can be once you get into that mindset.

I loosely used Kwik Sew pattern# 3150 - and I say loosely because I almost, pretty much, never follow any pattern or even recipe to the letter. Just can't do it. There are too many tweeks & ideas running around in my head for that. The pattern is also too simple for the results I wanted so lots of details were added. (like covering the back neck seam with twill tape) Besides, one size fits all is not my style. It all has to be better fit for the intended use/person. Also, when you are repurposing fabrics or any materials, really - there are limitations that you have to work with. 

It's about getting the best you can from what you have, and rising to the challenges that the item or project presents.

In laying out the pieces, I used the hem of the shirt for the sleeve ends, but couldn't do that for the body because I used the button placket at the top. And matching up the stripes at seams was not really possible, either - but I've learned to live with that. (my two year olds aren't that fussy yet!) In sewing these I learned something interesting - my machines didn't like stitching through the printed-on stripes of the grey shirt. The multi-color shirt was fine since the stripes are woven, not printed. The serger did ok, but mainly the issue was with topstitching on my straight machine. I had to topstitch upside down on half the hem, not really fun. And only a little bit better.

I realize that the finished item is not the same one as from the before & during pics... that's what happens when your main focus is two energetic little boys! I will post pics of both. These have been great - our go to cover-up for the beach or cool evenings. We've had plenty of cool temps here in the northeast this summer! They were such fun to work on, it sparked a slew of other wearables for my boys. Stay tuned.


About Us | Site Map | Privacy Policy | Contact Us | Blog Design | 2007 Company Name